Pages

Showing posts with label template. Show all posts

Wednesday, September 25, 2024

Lesson Plan for Week 3


This post is the third in a series of beginning-of-the-year lesson plans.  For previous weeks, please see:


Week 3!  Students keep asking "When are we using the bow?"  "Are we using the bow today?"  And my answer is ambiguous--"We're getting there" or "We're getting close, aren't we."  Or, "Look on the agenda on the screen to see what we're doing today."  In this third week, students are writing their own composition using the open strings.  We review the bow hold and add bowing with tubes (toilet paper tubes).  While the only piece students pluck this day is my sample composition (and perhaps their own), this is also their first week of full orchestra, and we play everything on p. 8 and 10 in Orchestra Expressions as well as much of p. 1 of the Orchestra Expressions Supplement packet, so I feel it balances out.

After students turn in their compositions, I will type them up over the next week, saved as Google Docs, so students can play everyone else's the following week.

Again for this lesson plan's script, I will assume this is a violin group.  For the other instruments, just substitute out the different sayings for the open string or instructions for how to draw the different open strings on the staff.  This lesson plan is for a 30-minute small group, designed for groups of about 3-4 students all on the same instrument.


ON THE BOARD:


ON MUSIC STANDS:


ALSO NEEDED:

  • Have spare folders and Orchestra Expressions books handy in case students forgot theirs
    • Composition #1 worksheet (already in folders if prepped by semester--but have extras ready for students who forgot theirs or the rare student who already discovered it in their folder and already wrote a composition on their own)
  • Pencils for students (already in folders attached with yarn)
  • Basket of toilet paper tubes
  • Dry erase marker/whiteboard
  • CD player with Orchestra Expressions CD
  • Camera/cell phone to take a few pictures of a few groups
  • Spare instrument for me
  • 1-page Google Doc condensed version of this lesson plan (includes lesson plan for first full orchestra rehearsal too)


AS STUDENTS ARE ENTERING:

Welcome!  Go ahead and grab your case off the rack.  Cases go on the left-hand side of the chair with the little end in the back.


UNPACKING:

Pull the handle in towards you to put the case flat on the floor.  Unzip or unlatch the case to open the top of the case.  Take the violin out of the case by holding on to the neck.  Sponge or shoulder pad goes on, then find rest position. [While they are getting settled in, I am pulling out their Composition #1 worksheet from their folders]


COMPOSITION #1:

So far this year, we've been playing lots of music that other people have composed.  Today, YOU get to be a composer.  You get to write your own music for the violin!  I'll take a volunteer to read the paragraph at the top.

[Student reads]

Thanks [name].  And we'll practice drawing the different open strings together in a moment, but first, do you see the composition that I wrote?  It's called "Falling Leaves."  I see the treble clef at the beginning, so I know it's violin music.  Next is the 4/4 time signature telling us 4 beats in a measure.  Up above I see pizz. with means...pizzicato, the Italian word telling us to pluck.  What's the first open string in my piece?  And then?

Let's play "Falling Leaves."  Playing position, left hand underneath, way up high, jawbone on chinrest.  L shape, thumb on the corner of the fingerboard, "Good Dogs Always."  Ready, play.

[If needed, may pause before m. 3 and regroup by figuring out the next open strings or go back and play the second half again]

Rest position.  Actually, leaving the sponge or shoulder rest on, gently set your instrument in its case.  In your folder you have a pencil.  Go ahead and take out the pencil, and let's go through the check list together.

First, we'll need a title.  I named my piece "Falling Leaves"; you can name your piece whatever you like.  Next, we need the name of the composer, so go ahead and write your name on the "by" line.  

We need a treble clef at the beginning so we know it's violin music--that's been done for us already!  We can check off "treble clef."

Next, we need a time signature after the treble clef so we know how many beats go in each measure.  Your choices are 3 beats or 4 beats in a measure.  I chose 4 beats in a measure for my composition, so I wrote the 4/4 time signature after the treble clef.  If you'd rather have 3 beats in a measure, write the 3/4 time signature after the treble clef.

We need bar lines between each measure--that's been done for us, so we can check off "bar lines."

Then, we need a double bar line at the very end.  That's been done for us too, so you can check that off.

For rhythms, we'll use quarter notes and quarter rests, which each count as one beat.

Then, you can use any of the open strings, G, D, A, E.

Do you see the picture of the pencil about halfway down on the paper?  That's where we're going to practice drawing the different open strings.

The G string is the lowest sounding string of the violin.  It is so low it doesn't fit on the staff, so first we are going to draw two ledger lines below the staff [I draw the two ledger lines on the board, after the treble clef that's already up there, then walk around and make sure everyone has drawn two ledger lines on theirs and that they know where on the page we are]

Next we draw the note head below the bottom ledger line.  The note head is this oval shape.  We color in the note head, then give G an up-stem, up to the right.  Go ahead and draw a couple of open Gs. [Walk around and look at papers to make sure everyone's following along]

The D string is a little higher sounding, so we'll find it a little higher on the staff, just below the staff.  Draw the note head, the oval part, just below the staff.  Color in the note head, then give D an up-stem, up to the right.

Are you ready for A?  The A string is a little higher sounding, so we draw it even higher on the staff, in the second space, between the lines.  Draw the note head between the second and third lines, on the space, and color it in.  A gets an up-stem, up to the right.

The E string is the highest sounding open string for the violin, so we'll find it way up high on the staff, on the top space.  Draw the note head for E between the top two lines, in the space, and color it in.  Now, E is a little bit different from the other open strings.  E gets a down-stem, down to the left.  [If someone asks why, I draw an E with an up-stem and show how the stem is hanging out in the white space outside of the staff and say we want the stems to mostly be in the staff area and just keep it at that]

You may want to include a rest in your composition too.  I like to draw a rest like a zig-zag or lightening bolt.  A rest counts as one beat too.

Okay, it looks like we're ready to write our first composition for the violin!  Congratulations!

[If students want to try out different sounds on their instrument to get ideas of what to write, that's fine, but I do try to keep things moving along so there's time for everything else I have planned.  I walk around and look over their shoulders and say things like "What time signature would you like?  Do you want 3 or 4 beats in a measure?  The 4/4 goes right after the treble clef.  There you go." Or "Which note would you like to start on?"  Or "Let's count how many beats we have going on in this measure.  The rest counts as one.  3/4 time signature says we have room for 3 beats in each measure and I see 5 beats, so decide which 3 you want to keep and then you can move 2 over to the next measure," etc.]

[I take a picture of one or two groups working to include in the weekly orchestra newsletter]

[As students are getting close to finishing, or in an effort to speed up their work, I'll say "Once you're done with your composition, I'll collect them so I can type them up on my computer this week so that next week you can play EVERYONE's violin composition" and possibly "I bet we can finish our compositions in the next two minutes so we can move on to the bow today."]

[If a student finishes well ahead of the others, I ask them if they want to try out their piece and see what it sounds like.  Then I collect their composition--quickly glance at it to make sure their name is on it and I can read their title--and that the title is school-appropriate--and then tell the student to take out their bow.  I work on their bow hand until another student is finished with their composition and ready to join us.]


BOWING WITH TUBES:

Go ahead and take the bow out of the case.  The first thing we do is...tighten the bow.  Righty-tighty, clockwise.  You'll notice the stick and hair are getting farther apart.  Keep tightening until you can fit about a pinkie or pencil between the stick and the hair.

Then find your bow hold.  Shake, flop, back of hand in toward nose. [I make individual corrections as quickly as I can while I am also opening their books to p. 11]

Okay, I have a present for each of you.  Don't get too excited. [Put a tube on their bow]

With the left hand, hold the tube on the left shoulder [left knee for cellos, left leg for bass].  You're going to have to hold the tube with your left hand so it stays put.  Find the bow hold, pinkie on its tip, middle fingers over frog, little space for pointer, thumb is bent. [I am modeling all of this too]

There are two directions we can pull the bow: Down and Up.  Down, up. [Students are copying my motions].  Notice the upper arm stays still.  The elbow opens and closes so we can go Down and Up.  [For cello/bass, I say "Out and In."  We call "Out" "Down" and "In" "Up."  I know we're not really going down and up, but the violins and violas do.]

The Italian word that tells us to play with the bow is arco.  Say "arco."  Then, there are symbols for down-bow and up-bow.  The symbol for the down-bow looks like a staple and tells us to pull the bow down.  The symbol for the up-bow is the V shape that tells us to pull the bow up, back towards the frog.

Let's play "Rhythm No. 1."  Do we start down-bow or up-bow?  Right, down-bow, so we need to start with our hand up by the tube, so the first direction we pull the bow is down.

[Play with CD track 13, do the repeat for each rhythm and then skip to the next rhythm.  The CD timing works out that it finishes right after the repeat of "Rhythm No. 4."]

[I take a picture of one or two groups--one violin/viola group, one cello or bass group--to include in the weekly orchestra newsletter]

Now, in "Rhythm No. 2," it told us to do "down, up, rest rest" but then there weren't any bowing markings in the second measure.  How did you all know which direction to pull the bow?  [Take some student ideas]  Well, we had just played "down, up, rest, rest"--what is our hand ready to do next, down or up?  Right, we keep going back and forth, down, then up.

Tubes can go back in the basket. [I'm bringing around the basket for tubes]  Do you think you can find a tube at home so you can practice this page 11 at home this week?

We had tightened the bow before, so now we need to...loosen.  Lefty-loosy, counter-clockwise.  You'll notice the stick and hair are getting closer together.  Keep loosening until the stick and hair are just about touching.  You might see some individual hairs start to separate.  

Holding on to the frog, gently slide the tip of the bow back in the case, then turn the knob or dial to hold the bow in place.


LEFT HAND PLAYING POSITION:

[Violin/viola only; cello/bass skip right to packing up]

Today I'm going to show you a new place for our left hand, left hand playing position.  Let's pick up our violins again and find rest position.  Now, with the left arm, do an arm swing.  On one of these swings, come all the way up to look at the palm.  Notice the wrist is naturally straight and the fingers are naturally curvy.  Let's do that again.

Now, let's go into playing position.  Left hand underneath, way up high, jawbone on chin rest.  Now, instead of making an L shape, let the right hand hang on to whatever is comfortable for you so that the left arm can do an arm swing.  [Nope, your other left.  Right hand is hanging on to the violin so left arm can swing.  It might feel kind of weird] Swing all the way up to look at the palm of the hand.  Notice wrist is straight, fingers are curvy.

At the base of our pointer finger is a knobby bone.  We're going to balance the neck of the violin on that knobby bone, thumb touches lightly across (by the red tape).  This is left-hand playing position.

[I go around adjust hands as needed]

One more thing today.  Let's bring the left elbow in towards the belly button so pinkie is over the G string.  Now, as the elbow swings out, let the pinkie drag across the strings to strum all the strings.  I'll come around and help.  After you've done it, sponge or shoulder rest comes off, time to pack up.

[I go around and help each student, then direct them to pack up]


PRACTICE ASSIGNMENT:

For practicing this week, we have p. 8 and 10 in the book again.  P. 11 is new; it's the page we did today with the bow and the tube, so you'll want to find a tube at home this week.

In the white packet, we've been playing p. 1; you're ready to play everything on p. 2.  There are harmony parts for songs like "Mary Lee" and "Ode to Joy."

On Canvas, there are bonus videos that go through everything that we did today, so if you want a refresher on how to bow with the tube or find that new left-hand playing position, click here and that will take you to the video you can watch and play along with at home.

Let's check the schedule for when I'll see you next.

Cases and folders can go back on the racks.  See you at the end of the day when you come to pick up your instrument!  Congratulations on writing your first composition today!


--


As compositions get turned in, I try to keep up each day with typing them up (and drawing two stars on each with colored pencil--one for drawing the different open strings and one for writing the composition--as well as writing any corrections or comments or "nice repeat" for those who thought to add the dots to turn the double bar line into a repeat sign).  I also scan a copy of the whole stack once finished, just for myself, and I get the composition sheets in order for the next week so it's easy to hand them back.  I also print one set of typed compositions on colored paper to tape up on the STAR Musician wall.

I also add a couple pictures to the weekly orchestra newsletter of students composing and bowing with tubes, so families get a visual too.


Go to: Lesson plan for Week 4


Monday, January 2, 2023

G Major Composition


In the spring, actually it tends to fall right around spring break, second-year orchestra students write their second composition of year, this time in the key of G Major.

We sight read a number of pieces in the book in G Major and I ask a series of questions for each one: What is the first note of the piece?  (Ah, it's a note from the G Major arpeggio!)  What is the last note of the piece?  (Oh, a G, or Do?  I bet it will sound finished when we get to the end!)  Do you notice any arpeggios in this piece?  In the Orchestra Expressions book, p. 48, we play "El Charro", "El Tren", and "Happy Birthday."  Sometimes we have to play the piece a couple of times before someone spots the G, B, D or D, B, G, but students very quickly catch on that the last note will be G, Do, and can answer my question before I finish asking it by the time we get to "Happy Birthday" :)

On composing day, I'm also listening to students play their G Major scale playing checkup.

Most students don't finish during their small group that day, so I'll take a picture of compositions still in progress with my iPad (in case students forget to bring their folder the following week when it's due...then they don't have to start from scratch as they finish their composition in class).  If students do finish, I'll collect them to get a head start on typing them up/grading them.  

Students earn a grade (4/3/2/1--exceeds expectations/meets expectations/basic/does not meet expectations) on rhythm (variety of rhythms, correct number of beats per measure), music literacy (using notes from the G Major scale in a way that clearly shows that G = Do), and evaluating (including two or more of the musical tools).  I don't emphasize the graded aspect of this, but if students follow the checklist, they will be fine.

I will type these up so everyone can play their classmates' compositions and see theirs in print.  This year I am trying to save paper, so instead of printing a packet for everyone, I'll share the Google Doc link on our Canvas page for students.  Now that I have a screen/projector at both schools, I'll show the document on the screen in class, and we'll scroll through it and pick one or two to try in class.  It's a little tricky if I have students on different instruments in the same small group--I'll have two windows open, one on the top of the screen and one on the bottom and scroll through both.  Or, if it's one student on a different instrument, I might give that student my iPad and pull up their instrument's document there.  We will play one or two of these for the spring concert, so those I will print out and tape into folders (after checking with the composer to make sure it's okay with them we perform their piece).  I'll improvise a piano accompaniment too.


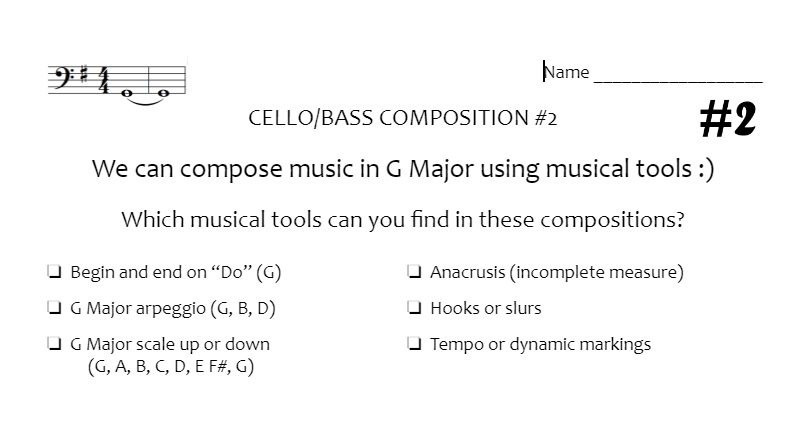
G Major composition with toolbox:


Updated G Major composition with G Major clues and musical toolbox:

Template for G Major composition packet (Google Doc):


* = updated January 2026 for clearer resolution


Happy composing!


--


Links to other composition worksheets: 


Wednesday, August 17, 2022

Parts of a Note Beginning-of-the-Year Bulletin Board


For this year's beginning-of-the-year bulletin board, I wanted to label the different parts of notes and eventually came up with the title "Take note: We are all PART of what makes our school community shine!"  It's a little wordy, but I liked that it included both "note" and "part."  You could insert your school name in place of "our school community" too.  This bulletin board can also double as a year-round reference, simply titled "Parts of a Note."  


Parts labeled:

  • Note head (the internet is telling me it's really spelled "notehead" but I just can't do it...)
  • Stem
  • Beam
  • Flag
  • Dot


I used the pictures of the different rhythms from this blog post and rearranged them for each note part (see links to printouts below).  I did use a black Sharpie to round out a couple places that looked a little cut off.  For the large version, I printed as-is, then cut a half-inch off each side to be able to use an 8 1/2 by 11" background.  For the smaller version, I set the print settings to 2 pages per sheet and then cut each to 3 1/4 by 4 1/2".  The colored background was a half-sheet of paper, 4 1/4 by 5 1/2, with a bigger black background behind that, again cut to make a half-inch border.


For the large pair of eighth notes, I didn't trust my free-hand drawing skills, so I greatly enlarged an image of an outline of eighth notes, printed/cut/traced onto black paper and then cut/attached the pieces.  I used a Cricut for the text (Fontastic Fonts, DJ Smooth) and arrows, but created a Google doc with everything here to print out.


Feel free to use!


Monday, February 21, 2022

Elementary Orchestra Solo/Ensemble, Part 3: Creating the Schedule


For creating the Solo/Ensemble festival schedule, I use two documents.  One is the one-page master schedule which lets me see the entire schedule at a glance, and the other is the Google Sheets master schedule.  I had an administrator one year show me how to link different tabs (and even documents) to the master schedule so that they automatically update when I make a change on the master schedule tab.  I was so excited to learn about this--before then, I would email PDFs to families, but then once any updates were made (which inevitably happens), those PDFs are no longer current and I'd have to send out a new one.  Now families can access the link whenever they want and see the most up-to-date schedule.  I cannot thank him enough for showing this to me!!!  

The process of making the schedule takes a bit of preparation and time.  First I enter all the entries into the Google Sheets master document, using ? for any students in a registered student's ensemble who I haven't received a registration form yet.  I'll check in with those families individually the next week to see if they can participate or if I should delete their name from the schedule.  If any members of an ensemble are also doing a solo, I am sure to add those entries next so that they're all grouped together before I start assigning times.  

The different headings in the Google Sheets master schedule include Site, Time slot, Name(s) [first name only], Name(s) [full name], School, Grade, Title, Time Request, Adjudicator.  (I keep the Site, Time slot, and Adjudicator blank until I'm actually assigning times.)  I have the two separate columns for names because I'll use the full name on the schedules I post outside of the sites at the festival and to use mail-merge later on to create the rubrics and then the first name on the schedules I share with families to share privacy of the students a little bit (and hide the column with the full names).

To begin scheduling, I'll write in a few break times for adjudicators on the one-page master document, spacing them out so each adjudicator has their break during a different time slot.  This one-page master document has 5 sites with 8-minute time slots running from 8:00 am to 12:00 noon, so 30 time slots per adjudicator, 150 time slots total.


Then I start assigning times to those with time requests first, being sure to add their names to the one-page master schedule and then type the corresponding site and time on the Google Sheets master schedule.  Any students who are in more than one event get scheduled two or three slots away from their first time so that they don't have to be at the festival the entire morning.  I don't schedule them any closer than two or three slots away in case their first room is running late and their second room is running ahead of schedule.  I do want a little bit of a breather in-between for the student to regroup and focus on their next piece.

After the entries with time requests are scheduled (and any of those students' ensemble partners' solos), I look for students who are in more than one event and schedule them next, putting each of their events in different sites so they will get to work with more than one adjudicator.  If there are any ensembles where only one member can attend, I plan to play with that student as their ensemble partner and then am careful not to double-book myself during a particular time slot. 

Finally students who are only playing a solo, no ensemble, and have no time requests get entered last to fill in the spaces.  When it gets down to the last few, I'll count the number of events and empty slots for each adjudicator so I can even it out as best as I can.  Any super late registrations that come in after this point can get added to any empty slots until the schedule is filled.

Once the Google Sheets master schedule is completed, I go to Data, Sort range, then Advanced range sorting options. Be sure to check "Data has header row," then sort by "Time Slot" and then by "Site."  Now I can look through the other tabs that auto-populate to see the schedule for each site, and the entries for each school from the beginning of the day to the end.  I can't believe I used to do all those different sorts manually and then copy/paste into new tabs and then have to update all of those for any changes!  This function is a life saver! 


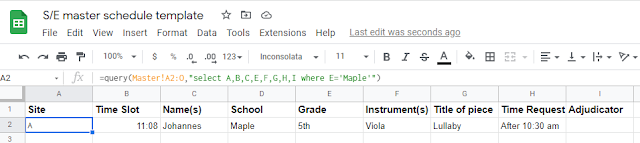
In this picture above of the Maple tab, I'm getting an error (where it says #N/A in A2) because in the query line, it says D='Maple', but in my master tab (below), the name of the school is really in column E, not D. 


Once I change D='Maple' to E='Maple' in that formula, the entry from the Master tab with "Maple" as the school auto-populates into the "Maple" tab.


Here's what the formula looks like for the Site A tab:


For Site B, the last bit would say where A='B'").  I wanted the student's full name, not the first name for this tab, so up in the query line, I have "select A,B,D,E,F,G,H,I where A+'A'"--I skipped C, which is the column in the Master tab with the first name.


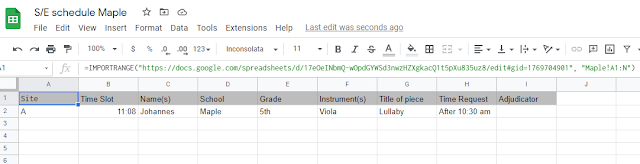
Once all that looks good, I do create separate Google Sheets schedules for each school's tab.  In a new Google Sheet, I copy/paste the formula down below into the A1 box.


In the A1 box, here's what's inside: =IMPORTRANGE("https://docs.google.com/spreadsheets/d/1Eb3tXGMrsvrMWzRSdnb7tghBm9GpL2ouPDv8rk4HFp4/edit#gid=1276309528", "Maple!A1:N")

The http://.... is the URL of the Google Sheets master document.  After the , " is the name of the tab I want, in this case Maple.  This document auto-populates, and it automatically updates whenever something on the Google Sheets master document gets changed.  I make sure the column with the students' full names is hidden on this document, as I will change the sharing permissions to "Anyone with the link can view." and I'll share this one with families and post on our class Canvas page.  I also go to Format, Alternating colors to make this one easier to read.  This is the file I will print and post in the orchestra room too.

For the festival, I print off a copy of the one-page master document for myself and then copies of the schedules for each site to place outside each room and to put in each adjudicator's folder.  A copy of the schedule by school (and also by site) gets taped to the wall in the cafeteria, where students are warming up, so they can look if they need to check their time.

While I don't totally understand the formulas in Google Sheets, I can copy/paste from the previous year and make adjustments as needed to make sure everything is auto-populating as it should.  Please let me know if there are any steps I should clarify or provide screenshots of!

Monday, January 7, 2019

String Fest Seating Chart Template


String Fest seating chart template and illustration


Our annual district-wide String Fest is a big event for us to plan.  One part of the planning process is figuring out where each of the 200+ elementary string players will sit in our giant combined orchestra.  We want kids to share a stand with someone from their school but to sit near kids from other schools.  We place second-year players in the front rows of the orchestra and first-year players in the back few rows.  I'm not quite sure of the magic number of chairs/stands per row regarding space, so some rows end up being a little roomier than others--or we may rearrange a bit once we see everything set up in the field house--but at least we have a pretty close idea of where everyone will end up from the start.

This is pretty much my step-by-step process:

1. Determine number of students per instrument per grade level per school.
2. Draw orchestra seating chart, using dashes for stands (use pencil!).
3. Add dividing lines with colored pencil to show the different instrument sections and grade levels.
4. Number each stand from left to right for each row (violin side to cello side). 
5. Write in school abbreviations for each stand, trying to be equal about school representation in the front row and outside stands (if there is an odd number of students at a school within a section, use a dash to pair up students from two different schools).
6. Include total number of chairs and stands per row at the bottom of the page.
7. Make a copy of the Google doc template, and then update the number of chairs per instrument/section/row in the copied document.
8. Change the font for the seat numbers (1A., 1B., etc.) to correspond with each of the schools.
9. Scan seating chart and share that and the Google doc with all orchestra teachers.
10. Now each teacher can add their students' names to the Google doc.

String Fest seating chart template

I do show students ahead of time where they'll sit and by whom, but then I also make name cards to tape on the music stands.  I use the following Word document with Word's "mail merge" feature (Mailings/Start Mail Merge/Step-by-Step Mail Merge Wizard) to pull student names/instrument/grade level from an Excel sheet of my rosters.  I'll also include an image of the school mascot to help students more quickly spot their own name card.  And then, of course, I do color-code the cards by instrument.  When printing, be sure to choose "2 pages per sheet."  One of these years I will type up the row and seat number in the roster to include with the mail merge, but so far I've just been hand-writing the row and seat number on each card.  I put the name cards in numerical order (by row, then seat number), and then it's quick work to set them on the proper stand and tape them up the day-of.

String Fest name card template (2 names per page to cut apart and tape on stand)
String Fest name card template (1 name per page to fold over stand and view from both directions)


String Fest seating chart template and illustration


String Fest seating chart template and illustration


String Fest seating chart template and illustration


String Fest seating chart template and illustration


Monday, November 5, 2018

Winter Concert Programming


Winter concert elementary orchestra programming


It's that time of year to be thinking of winter concerts!  This post is brought to you courtesy of a reader wondering what to program for beginners' first concert.  (Again, thanks for reading, thanks for your question, and glad I could offer some ideas!)  At my schools, we share our winter concert with band and choir, so the entire orchestra portion (for first- and second-year players) runs about 25 minutes, for an hour-long concert total.  Orchestra students at my schools meet for small groups once a week for 30 minutes and full orchestra during recess once a week for 30 minutes, so here is the kind of music I program for our first concert of the year, given my specific situation and the pacing that allows.

Beginners:
We play about three pieces, one that's all pizzicato open strings that everyone has been playing since the first or second week of school and everyone knows really really well (like the harmony part to "Bile 'em Cabbage Down" from the Supplement Packet and I play melody on the violin), one that has a pizzicato open-string harmony part and pizzicato melody with D string notes (and then we'll play it a third time, perhaps arco, and kids can choose which part to play) with a short piano introduction before each time, and then we have a tradition of playing "Serenata" by Dale Brubaker, from his "Concert Tunes for Beginning Strings" book.  "Serenata" is all open strings, arco, and students love this piece!  By this time of the year, students have composed two pieces so far, so we'll play a pizzicato composition of D string notes for each instrument, as well.  I play piano for everything (and make up a piano part to accompany the students' compositions too).

Second Year Players:
We'll play two or three pieces, grade 1, one of which we'll be performing the following month for our district-wide String Fest, and one that is just for the winter concert.  I conduct these pieces (and have a hand ready to jump in at the piano to help support if needed).  There are always a couple of students that remark that they're playing fewer pieces than the beginners, but I tell them that theirs are much longer than the beginners' pieces, so it balances out time-wise.  The other String Fest pieces they're working on are also in various states of preparedness, and those two or three concert pieces are really what they're ready to perform for an audience at this point.

Combined Orchestras:
If the beginners are in pretty good shape with a String Fest piece by this time, we'll do one combined piece, a sort of sneak preview to String Fest, and then we always end with "Jingle Bells" before turning it over to the band.


Melody/harmony pieces for beginners:

Some winter concert pieces I've programmed for second-year players:

Combined pieces:


About a month before the concert, I send a half sheet of concert info home (and post it on our class page online).  This is the same day I invite students to decorate flyers to advertise our concert.  Please see this post for flyer and concert program templates.

At the concert, a principal or I will welcome families, and then I have students introduce each of the pieces.  This is for a couple of reasons: first, students take more ownership when it's the performers telling their families about what they're about to hear (and students get really excited to have a speaking part and talk into a microphone), and second, it gives me a chance to deal with instruments that go out of tune or bridges that fly off of instruments or bows that explode between pieces without having to make everyone wait.  If there were more time, I would have students write the speaking parts, but as it is now, I write them and students read them.

Here's a sample script of speaking parts.  In full orchestra, a couple weeks before the concert, our question of the week is to drop their name in the bucket if they would like a speaking part.  The next week, I draw names, and those kids come up and write their name on the board next to the piece they'd like to introduce.  I have the script cut into strips and give each student their part to practice.  I do print off three additional copies--one for the alternate to practice from in case anyone is absent on concert day, one to leave on the stand for kids to read off of, and one for myself so I remember who's doing what.

At the concert, I have beginners start off in the front of the orchestra (with second-year students sitting in the back of the orchestra with their stand partner).  Then the two groups switch, and the second-year students stay in the front for "Jingle Bells."  I use masking tape to tape a little name card of both sets of stand partners on each stand, so the kids know where to sit.  I make students sit with their stand partner even when they're just sitting in the back of the orchestra listening to the other orchestra play so that they know their folder of music is accounted for and because I have fewer behavior issues when students are sitting where I want them to sit :)

The last two full orchestras or so are dress rehearsals where we practice sitting in our concert seat with our concert stand partner, staying in rest position while the speaker says their part before each piece, and having our music all in order, and standing and smiling together at the end etc.

I'd be curious to hear what other teachers do for beginning orchestra concerts.  I've heard of more informances where the concert really shows families what a typical day in orchestra is like and might include showing the different warmups and such, but I haven't tried that before.  My hope is that the speaking parts give not just background information about the pieces but also what the students have learned and what to listen or watch for during the performance.  I've also heard of concerts where the students have been teaching a parent or family member how to play their instrument as the students are learning over the weeks and then there's maybe a piece on the concert where all the family members come up and play the piece that they've learned.  I haven't tried that before either, but I would be interested in hearing how that has worked out for others.  Any other ideas or formats or favorite pieces for winter concerts?

Winter concert programming ideas speaking part

Friday, March 2, 2018

Women Wow the Music World! Bulletin Board


Women's history month music bulletin board female composers performers


March is Women's History Month, and this year I wanted to create a bulletin board highlighting female musicians throughout history.  Thanks to my mom for coming up with the title: "Women Wow the Music World!"(and for cutting out and mailing me the letters)!

As with some previous bulletin boards (see the post "Celebrate Music with these Great Americans!" for Black History Month), I printed out the "condensed" file, trimmed and laminated each half sheet, and then attached them to a folded piece of colored paper.  If you'd rather save some steps, just print out the "double sided" file, fold each page in half, and you're ready to staple them to the bulletin board!

For each musician, I included her name and picture on the front and then her name, dates, country, instrument, profession, genre, and one famous title when you lift up the flap.

Here are the 24 musicians included (feel free to add your own):

  • Martha Argerich
  • Amy Beach
  • Hildegard von Bingen
  • Nadia Boulanger
  • Regina Carter
  • Cécile Chaminade
  • Sarah Chang
  • Sandra Dackow
  • Jacqueline du Pre
  • Ella Fitzgerald
  • Aretha Franklin
  • Fanny Mendelssohn Hensel
  • Jennifer Higdon
  • Billie Holiday
  • Alma Schindler Mahler
  • Midori
  • Soon Hee Newbold
  • Florence Beatrice Price
  • Clara Schumann
  • Ruth Crawford Seeger
  • Anoushka Shankar
  • Bessie Smith
  • Esperanza Spalding
  • Ellen Taaffe Zwilich


Women Wow the Music World!--heading


Names, pictures, and trivia (condensed)

Names, pictures, and trivia (print double sided)

Enjoy!


Women's history month music bulletin board female composers performers


Women's history month music bulletin board female composers performers


Women's history month music bulletin board female composers performers


Women's history month music bulletin board female composers performers


Women's history month music bulletin board female composers performers


Women's history month music bulletin board female composers performers


Women's history month music bulletin board female composers performers


Women's history month music bulletin board female composers performers


Women's history month music bulletin board female composers performers


Monday, January 30, 2017

Celebrate Music with these Great Americans! Bulletin Board


With February being Black History Month, I wanted to create a bulletin board highlighting musicians and came up with the title "Celebrate music with these great Americans!"  It was hard to narrow the selection of who to include, so I think I will switch out some names halfway through the month (they won't all fit on my bulletin board at one time...).

I printed out the "condensed" file, trimmed and laminated each half sheet, and then attached them to a folded piece of colored paper.  If you'd rather save some steps, just print out the "double sided" file, fold each page in half, and you're ready to staple them to the bulletin board!

For each musician, I included their name and picture on the front and then their name/nickname, dates, instrument, profession, genre, and one famous title when you lift up the flap.

Here are the 24 musicians included (feel free to add your own):
  • Louis Armstrong
  • Chuck Berry
  • James Brown 
  • Regina Carter
  • Nat King Cole
  • John Coltrane
  • Duke Ellington
  • Ella Fitzgerald
  • Aretha Franklin
  • Dizzy Gillespie
  • Jimi Hendrix
  • Billie Holiday
  • Scott Joplin
  • B.B. King
  • Wynton Marsalis
  • Bobby McFerrin
  • Jelly Roll Morton
  • Thelonious Monk
  • Charlie Parker
  • Florence Beatrice Price
  • Bessie Smith
  • William Grant Still 
  • Sarah Vaughan
  • Fats Waller

Celebrate music with these great Americans--heading

Names, pictures, and trivia (condensed)

Names, pictures, and trivia (print double sided)

Enjoy!


Celebrate Music with these Great Americans bulletin board


Black History Month: Celebrate music with these great Americans! bulletin board


Black History Month: Celebrate music with these great Americans! bulletin board


Black History Month: Celebrate music with these great Americans! bulletin board


Black History Month: Celebrate music with these great Americans! bulletin board


Celebrate Music with these Great Americans bulletin board