Pages

Showing posts with label organizing. Show all posts

Monday, March 24, 2025

Grade/Attendance Sheet


While my school does all their attendance records online (on Infinite Campus), I still print out my own attendance sheets, which also double as a place to record grades.  They are, of course, color-coded by instrument, and then student names are in order based on their small group.  That way, whenever we are doing a quick playing check-up in class, I don't have to hunt for each student's name on my sheet--everyone in that particular small group are located next to each other on the grade sheet.  I can also see at a glance how many students in each small group might have forgotten to bring their instrument to school that day.  I also include a column with the initial of each student's teacher with an asterisk if they are in advanced math, since that impacts my schedule and is helpful information to have handy.

Each orchestra's grade sheet is printed on whichever color paper is that orchestra's color.  My binder has a colored divider for each of the four orchestras I teach, and then behind each divider is the small group schedule, grade/attendance sheet, and full orchestra seating chart, all printed on paper that matches that orchestra's color.  (I don't use the color printer, but the different colored background prints in various shades of gray that makes the different instruments look slightly different).

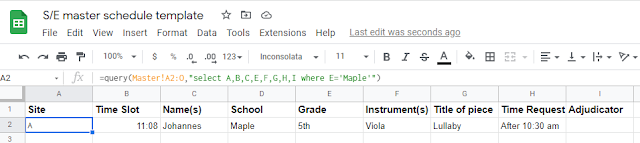
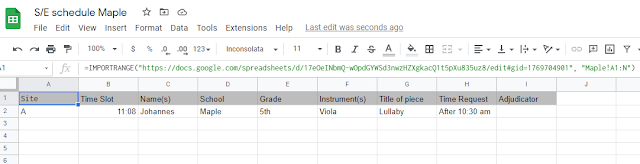
When I create a new small group schedule and small groups get changed, I reorder the names on my attendance sheet document and print out a new one.  I can edit the weight of the border to make thicker lines between each small group.  Each orchestra is a different sheet within the same Google Sheet, so I can easily move between tabs at the bottom.

Along the top of the paper copy, I can write in the date or the name of an assignment and what it is I'm grading.

With attendance, I use different markings to code different things I want to keep track of.  The slash in the upper left for Johannes Brahms in the screenshot above above means there is no instrument in that student's spot on the instrument rack so I need to check attendance on Infinite Campus to see if Johannes is absent that day or if he forgot to bring his instrument that day and will need to borrow a spare.  The slash in the lower left means a student forgot to bring their orchestra folder/book.  Poor Clara Schumann is missing both her instrument and music the second week of this attendance sheet.  If I arrive to school in the morning and see that someone's instrument has been left at school all week, I write a little dot in the box (see J.S. Bach above) and then check attendance to see if they're in school that day.  If someone is absent, I draw a circle and am sure to write that student a quick email to let them know what they missed at orchestra that week.  For students who are present and have brought their instrument/music, I don't write anything.  At the end of the semester when I am entering disposition grades for Responsibility, I can look back and count exactly how many times a student hasn't brought their instrument or music to school so I am not just relying on my memory.

For grading, my district uses numbers (4=exceeds expectations, 3=meets expectations, 2=basic), and I will record grades onto this sheet and then enter them into Infinite Campus.  With playing checkup rubrics/comment sheets, I take a picture of those before handing them back to students and then transfer the numbers onto the attendance/grade sheet so it's easier to enter into IC later.  In this case, I write the headings small enough so I can fit three grades in each box to save space.


Feel free to make a copy and edit in a way that works for you!

Sunday, March 23, 2025

Seating Charts


For full orchestra rehearsals, I put color-coded name cards on music stands so students know where to sit.  It is also easy for me to see at a glance who is missing.  I used to not create a seating chart and just try to mix up the name cards each week so students would be sitting with different stand partners and in different parts of the section until it was a few weeks before a concert and we would begin using concert seating (that I wrote out by hand).  I could also strategically place students together who would be sharing a spare instrument because they both forgot theirs that day.  After full orchestra, I would collect the name cards in order (Row 1 left to right, Row 2, Row 3, etc.), so I had that seating "preserved" until next week and could mix it up from there.  Of course, I couldn't remember which students had sat with which stand partners over the course of several weeks, so sometimes I would hear students say that they've sat with a particular person three times already and they hadn't sat with so-and-so yet.  But that system worked well enough for my purposes.

However, the pandemic arrived and changed things (to say the least).  We weren't able to hold full orchestra during the 2020-2021 school year (I videotaped myself leading "virtual" full orchestra rehearsals for students to play along with at home).  Then, once we were able to resume full orchestra rehearsals at school the following school year, teachers still needed to submit seating charts to the office in case of any contact tracing that needed to be done.  I started creating seating charts using Google Slides, color-coded, of course, by instrument and then referencing that seating chart to get the names cards in order so set-up each week was as quick and easy as possible.  I also make note of how many chairs and stands go in each row and how many are needed total.  This document is just for me--students don't need to see the seating chart; they're just looking to find their name card on their music stand when they enter the room.  It turns out that I really appreciated having a record of my seating charts and have continued to use this Google Slide method.


These days, I will keep the same seating chart about three or four weeks (we have once-a-week full orchestra rehearsals) and then mix it up.  I simply duplicate the slide, add the new start date on the top, and then drag the text boxes around.  In this way, old seating charts are easily viewable and I can reference them to make sure I am changing up stand partners and where in the section students are sitting.  Again, after each full orchestra, I just collect the name cards in order, and then I am all set for the following week.  If a student is absent that day, I still put their name card on the music stand; I just cover their name card with their stand partner's name card and set out one chair instead of two for that stand.  That way the name cards stay in order when I collect them afterwards.

This template document also includes concert seating charts, when I have two orchestras sitting in one big orchestra.  I like to start concerts with the beginners in the front and the second-year players in the back, and then once the beginners' part of the concert is done, students switch places so the second-year players are in the front (basses don't move).  We end with one combined piece, and everyone stays where they are for that.  (See also: Winter Concert programming)

For concerts, instead of putting giant name cards on music stands that the audience would also see, I type up students names in seating chart order in a quick Google Doc, cut them into little strips, and then just tape them on to the stands when I set up for the concert so that only the performers can see.  When students are sitting in the back of the orchestra, waiting their turn to play, I don't assign seats for that part; I just say they have to sit with their stand partner somewhere in an empty seat.  That way, right before the concert starts, if I see any empty seats, I can ask a student who their stand partner is to know who is missing without having to consult my seating chart.  I hope it also makes it easier when it comes time to switch seats to stay with their stand partner to know where to go.  When we do switch places mid-concert, I don't want students searching for their name somewhere in the back of the orchestra; they should just find an available spot--with their stand partner (since we play one combined piece together yet).  Students who are moving toward the front of the orchestra getting ready to play should more-or-less know where they're going because it's the same location they've been in for full orchestra the last couple of weeks and can verify they've found the right spot when they see their names on their music stand.


On music stands for the concert:

5th: Name, Name

6th: Name, Name


One year, I had such big orchestras that it just wasn't feasible to ask that many students to switch places in the middle of the concert, so I had the beginners on one side and the second-year players on the other side, as shown in the third slide in the template document (and below).  The 6th grade cellos were not particularly happy to be sitting in the back, but that's what made the most sense to me with the space we had available (we share the concert with the band and choir--the choir is on the stage, and the band is set up on the gymnasium floor alongside the orchestra).


For small groups (usually about three or four students), I do not create a seating chart.  However, at the beginning of the year, I do put name cards on the music stands for the beginners during small groups while I am learning their names.  Once I am more comfortable with remembering names, I only use the name cards for full orchestra, and students can choose where they sit for small groups.

For our district-wide String Fest, where there are 200+ students in our giant elementary combined orchestra, I still draw that seating chart by hand (See String Fest Seating Chart Template for that one).

How do you like to create seating charts?  I know there are more sophisticated programs out there, but the Google Slide version works for my purposes.

Sunday, September 24, 2023

Stuffing Folders by Semester


During the 2020-21 school year, I had several students who attended virtually instead of in-person.  When thinking about all the sheet music and handouts I give students throughout the year, I had to figure out how to address that with my virtual students.  I couldn't assume families had a printer at home, and I couldn't assume they could stop at the school office to pick up something anytime I had a new piece of music or handout.  And what about in-person students who might be at home quarantining for a week, but still attending school virtually?  I decided to make copies of everything students would be getting from me for the entire semester, paperclip it together, and stuff folders that way.


It worked really well, so I've been doing it that way ever since.  While it is a ton of time up-front, I feel it saves a lot of time during the school year--no need to be in the copy room every week running off the next thing.  No need to keep track of who was absent the week I handed out which piece and make sure they get it the following week.  When someone forgets their folder, no need to give them the new piece and hope they put it in their folder when they get home and then have to give them a second copy the following week when that didn't happen.  If someone is absent, or attending virtually one week, no worries--they already have what they need in their folder!  


I have found that students are less likely to lose random pieces of music or handouts--everything just stays in the folder.  On rare occasions, a student will lose their entire folder.  After a couple weeks, if it still hasn't shown up, I may make a new folder for this student by grabbing the contents of a spare folder.  Then when I have some extra time, I can work on rebuilding the contents of the spare folder, but that's not so urgent.


So, how does this all happen?  I went to previous years' lesson plans and figured out which pieces/handouts students would need in a semester and roughly in which order we would get to them.  While concert pieces change each year, I can slot in a new concert piece in the place of a previous year's.  Before school starts, when I have more time and the copy machine isn't being used by anyone else, I will make copies of everything for the roster that signed up the previous spring plus extras for spare folders and in case of new sign-ups in the fall.  I color code each piece so they can be more easily found in the folder, and I color code compositions and other instrument-specific handouts by instrument (violin-purple, viola-yellow, cello-green, bass-blue).  As I'm making copies, I do each piece or handout in the same order (say, violin, viola, cello, bass), so each stack has the same instrument part on top.  I have a Google Doc with the list of contents and highlight or cross out the ones I've copied to help keep track.


Once everything is copied, it's assembly time!  I arrange the piles on a large counter chronologically through the semester and then start pulling the top piece of paper from each pile to make one student's stack of music.  I'll put a paper clip through everything except the one or two things that we'll use the first day of orchestra so that they don't have to pull anything out of that neat stack the first day and potentially make a mess of their papers already.


I'll stack up the new stacks to make a new pile.  If I've made the right number of copies and haven't accidentally pulled two papers at a time instead of one, all the pieces/handouts will arrive at the next instrument at the same time.  If not, time to double check for a student's pile that ended up with two of something or time to make a quick copy.


Finally the folders are ready to be stuffed!  The folders already have the student name/instrument/grade/teacher labeled across the top, a pencil on a piece of yarn taped inside, a fingering chart, and the concert dates for the year and list of contents also taped inside.


Any beginning 6th graders will also get some extra items in their folder--an open string harmony part to the D Major scale, an Alpha-note version of their D Major scale pieces, a double-sided "Jingle Bells" with both the 5th and 6th grade versions, and 5th grade parts for our String Fest pieces--so that we are ready for whatever they're ready for once we get there later in the year.


Once I have created the first small group schedule of the year, I will re-order the folders so they're in the order that I will see the students on the first day.  That way distributing folders is quick and easy!  Spare folders will go on their shelves for easy access when needed.


Monday, February 28, 2022

Envelope for Collecting Papers


After handwriting a heading on a piece of paper and taping it on to a manila envelope for several years, I realized there were a limited number of types of things I would collect each year: sign-up sheets, permission slips, Solo/Ensemble registrations, composition assignments.  I decided to type up headings, laminate them, and attach Velcro dots to them and the envelope.  It looks a lot nicer than before, and the sheets can be reused each year.  Since they're laminated, I can also use a dry-erase marker to write a due date and then erase it afterwards.  The envelope is also Velcro-ed to the wall, so I can remove it when there aren't any papers needing to be turned in.


"Please turn in" signs 


Monday, February 21, 2022

Elementary Orchestra Solo/Ensemble, Part 3: Creating the Schedule


For creating the Solo/Ensemble festival schedule, I use two documents.  One is the one-page master schedule which lets me see the entire schedule at a glance, and the other is the Google Sheets master schedule.  I had an administrator one year show me how to link different tabs (and even documents) to the master schedule so that they automatically update when I make a change on the master schedule tab.  I was so excited to learn about this--before then, I would email PDFs to families, but then once any updates were made (which inevitably happens), those PDFs are no longer current and I'd have to send out a new one.  Now families can access the link whenever they want and see the most up-to-date schedule.  I cannot thank him enough for showing this to me!!!  

The process of making the schedule takes a bit of preparation and time.  First I enter all the entries into the Google Sheets master document, using ? for any students in a registered student's ensemble who I haven't received a registration form yet.  I'll check in with those families individually the next week to see if they can participate or if I should delete their name from the schedule.  If any members of an ensemble are also doing a solo, I am sure to add those entries next so that they're all grouped together before I start assigning times.  

The different headings in the Google Sheets master schedule include Site, Time slot, Name(s) [first name only], Name(s) [full name], School, Grade, Title, Time Request, Adjudicator.  (I keep the Site, Time slot, and Adjudicator blank until I'm actually assigning times.)  I have the two separate columns for names because I'll use the full name on the schedules I post outside of the sites at the festival and to use mail-merge later on to create the rubrics and then the first name on the schedules I share with families to share privacy of the students a little bit (and hide the column with the full names).

To begin scheduling, I'll write in a few break times for adjudicators on the one-page master document, spacing them out so each adjudicator has their break during a different time slot.  This one-page master document has 5 sites with 8-minute time slots running from 8:00 am to 12:00 noon, so 30 time slots per adjudicator, 150 time slots total.


Then I start assigning times to those with time requests first, being sure to add their names to the one-page master schedule and then type the corresponding site and time on the Google Sheets master schedule.  Any students who are in more than one event get scheduled two or three slots away from their first time so that they don't have to be at the festival the entire morning.  I don't schedule them any closer than two or three slots away in case their first room is running late and their second room is running ahead of schedule.  I do want a little bit of a breather in-between for the student to regroup and focus on their next piece.

After the entries with time requests are scheduled (and any of those students' ensemble partners' solos), I look for students who are in more than one event and schedule them next, putting each of their events in different sites so they will get to work with more than one adjudicator.  If there are any ensembles where only one member can attend, I plan to play with that student as their ensemble partner and then am careful not to double-book myself during a particular time slot. 

Finally students who are only playing a solo, no ensemble, and have no time requests get entered last to fill in the spaces.  When it gets down to the last few, I'll count the number of events and empty slots for each adjudicator so I can even it out as best as I can.  Any super late registrations that come in after this point can get added to any empty slots until the schedule is filled.

Once the Google Sheets master schedule is completed, I go to Data, Sort range, then Advanced range sorting options. Be sure to check "Data has header row," then sort by "Time Slot" and then by "Site."  Now I can look through the other tabs that auto-populate to see the schedule for each site, and the entries for each school from the beginning of the day to the end.  I can't believe I used to do all those different sorts manually and then copy/paste into new tabs and then have to update all of those for any changes!  This function is a life saver! 


In this picture above of the Maple tab, I'm getting an error (where it says #N/A in A2) because in the query line, it says D='Maple', but in my master tab (below), the name of the school is really in column E, not D. 


Once I change D='Maple' to E='Maple' in that formula, the entry from the Master tab with "Maple" as the school auto-populates into the "Maple" tab.


Here's what the formula looks like for the Site A tab:


For Site B, the last bit would say where A='B'").  I wanted the student's full name, not the first name for this tab, so up in the query line, I have "select A,B,D,E,F,G,H,I where A+'A'"--I skipped C, which is the column in the Master tab with the first name.


Once all that looks good, I do create separate Google Sheets schedules for each school's tab.  In a new Google Sheet, I copy/paste the formula down below into the A1 box.


In the A1 box, here's what's inside: =IMPORTRANGE("https://docs.google.com/spreadsheets/d/1Eb3tXGMrsvrMWzRSdnb7tghBm9GpL2ouPDv8rk4HFp4/edit#gid=1276309528", "Maple!A1:N")

The http://.... is the URL of the Google Sheets master document.  After the , " is the name of the tab I want, in this case Maple.  This document auto-populates, and it automatically updates whenever something on the Google Sheets master document gets changed.  I make sure the column with the students' full names is hidden on this document, as I will change the sharing permissions to "Anyone with the link can view." and I'll share this one with families and post on our class Canvas page.  I also go to Format, Alternating colors to make this one easier to read.  This is the file I will print and post in the orchestra room too.

For the festival, I print off a copy of the one-page master document for myself and then copies of the schedules for each site to place outside each room and to put in each adjudicator's folder.  A copy of the schedule by school (and also by site) gets taped to the wall in the cafeteria, where students are warming up, so they can look if they need to check their time.

While I don't totally understand the formulas in Google Sheets, I can copy/paste from the previous year and make adjustments as needed to make sure everything is auto-populating as it should.  Please let me know if there are any steps I should clarify or provide screenshots of!

Monday, February 7, 2022

Labels for Cases


 A few years ago, my district purchased new cello cases for our school instruments, so I ordered these plastic key tags to use as labels.  I liked that these came in different colors, so it was easy for students to identify their case out of the pile of cello cases when time to pack up.  Each year I type up the names of the students who are renting school instruments in the following document, then print, cut, and fold the strip in half.  I use a penny to open the key tag, and then the paper fits right inside.


Monday, January 10, 2022

Labels for Equipment and Instrument Racks


For our district-wide annual String Fest, we hire movers to transport chair and stand racks as well as cello and bass racks from the elementary schools to the high school's field house.  We want everything to end up racked up properly and returned to the proper school afterwards, so we are careful to label everything clearly.  I like to color code everything by school and add a picture of the school's mascot too.  I laminate the labels and then just use masking tape to affix to both the back and front of racks.


Sunday, October 3, 2021

Stackable Shelves for Folders


Last fall I made copies of just about every handout and piece of music that students would need for the first semester and stuffed folders just in case we had to switch to virtual learning at some point.  I ended up really appreciating not spending so much time in the copy room just about every week, so I did the same thing this fall.  I also made up spare folders for each instrument in case a student forgets their music at home.  Between four instruments and two grade levels and multiple folders per part, I had an unorganized stack of folders that was really bugging me.  I had to dig through the pile just to find the one I was looking for and didn't have a good system to keep them organized.

After a great find at Goodwill (under $5 total!) and some homemade color-coded labels, these stackable shelves are the perfect fit for these orchestra folders!